This examples show the "Show only a part of the iframe" feature which only available in the pro version of the advanced iframe.
If you are not on the same domain and you are not able to modify the external page you want to include than the only option you have is to use the pro version and include only a part of the iframe. For this solution you need to specify the size if the iframe and also a "viewport" that defines which area you want to show. The following examples with the used shortcodes can be found on this page:
- Example 1: Show a read only part of a remote page
- Example 2: Show another read only part of the remote page of example 1
- Example 3: Use a different viewport after a user interaction
- Example 4: Jumping to a different url after an user interaction
- Example 5: Using scrollbars for a view port
- Example 39: Zoom a view port (new 7.0)
- Example 40: Zoom a view port which also enlarges (new 7.0)
- Example 41: Zoom a view port and “Hide a part of the iframe” (new 7.0)
- Example 43: Zoom a view port with loading indicator, scrollbars and ios scrolling support (new 7.0.4)
- Example 55: Show different view ports with media queries
To make it easier to copy/paste the examples most examples are fully configured in the shortcode directly. I use use_shortcode_attributes_only="true" that none of the settings from the administration are used.
Screenshots of the administration
You can can configure this in the administration on the advanced tab -> Show only a part of the iframe:
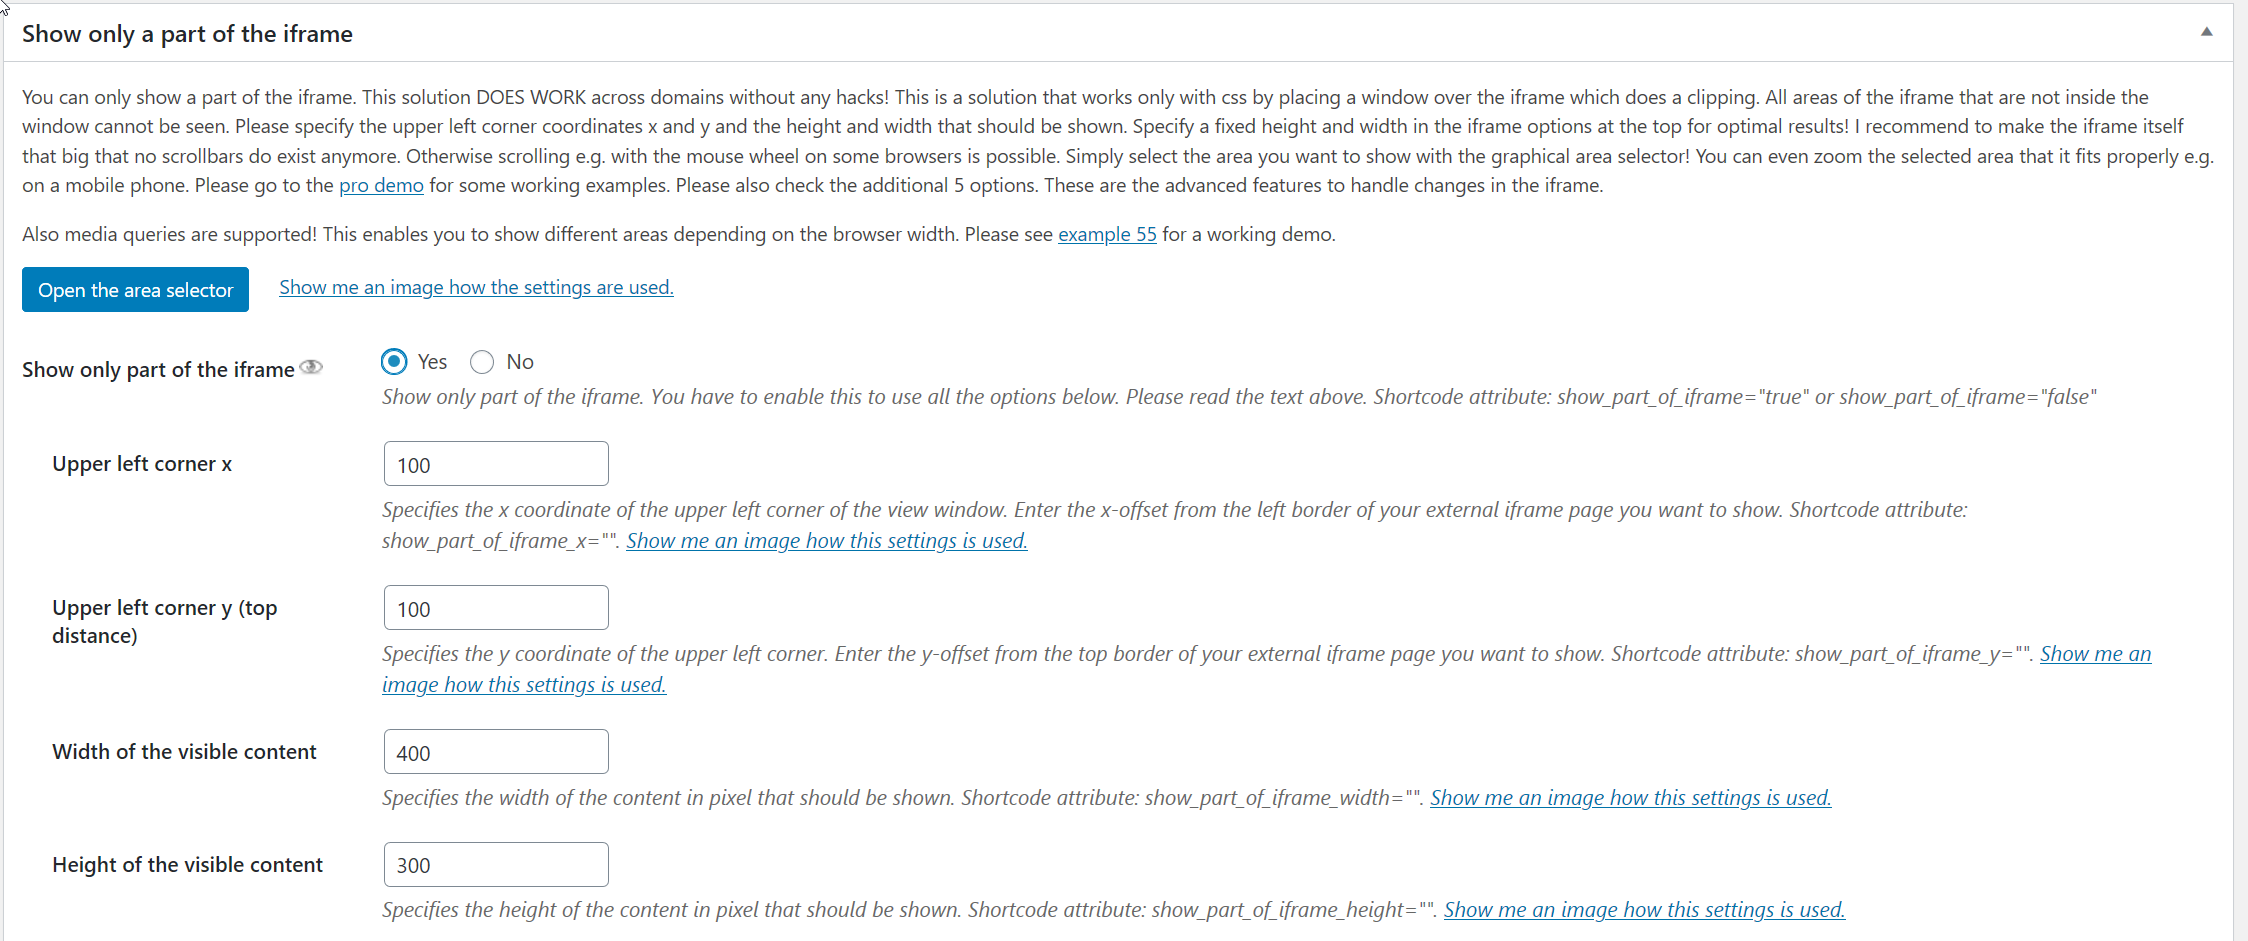
The section of the "Show only a part of the iframe " can be found on the advanced tab.
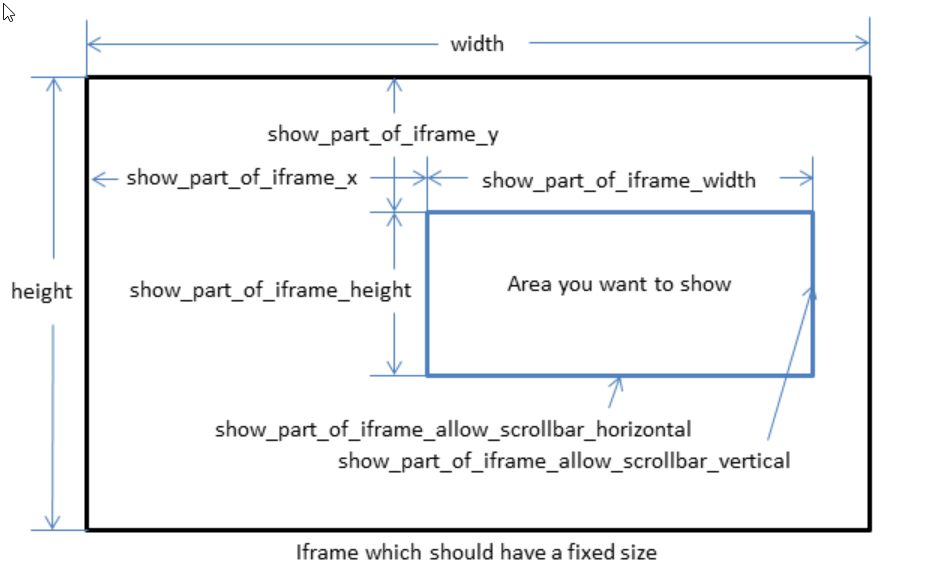
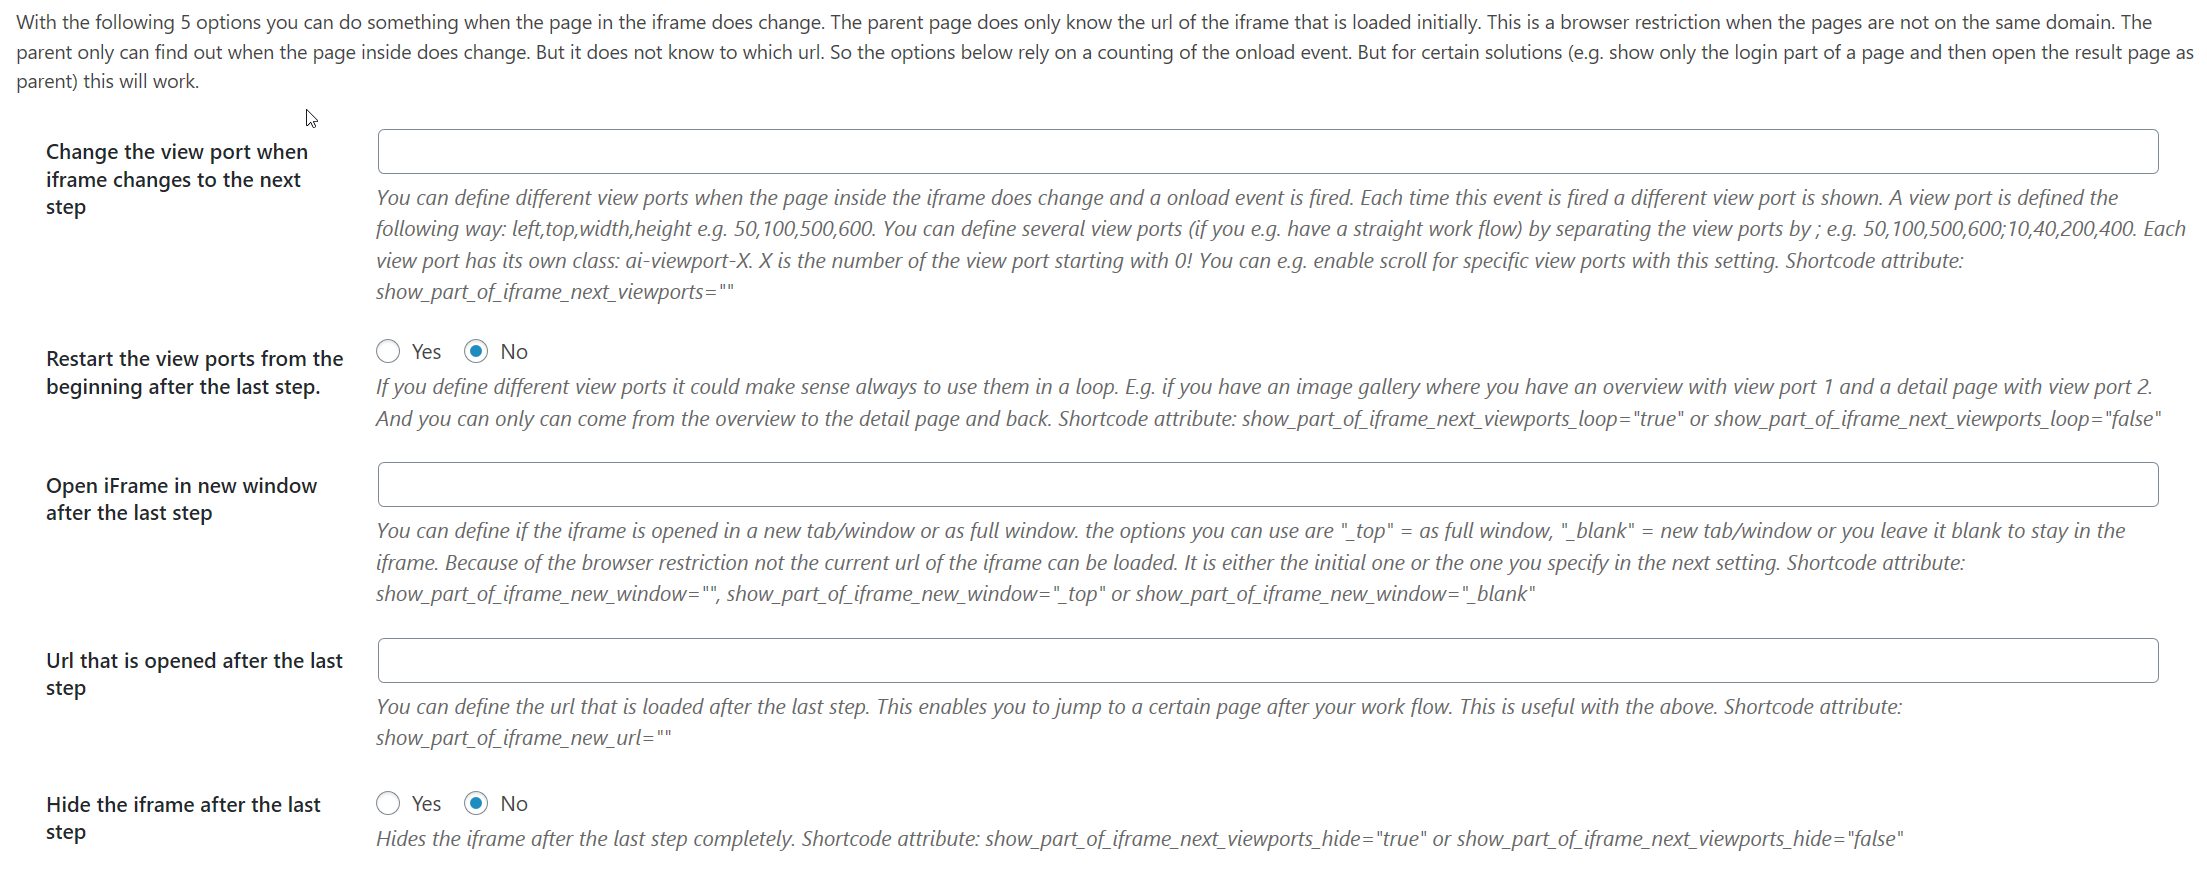
This screen explains the different parameters of "Show only a part of the iframe".
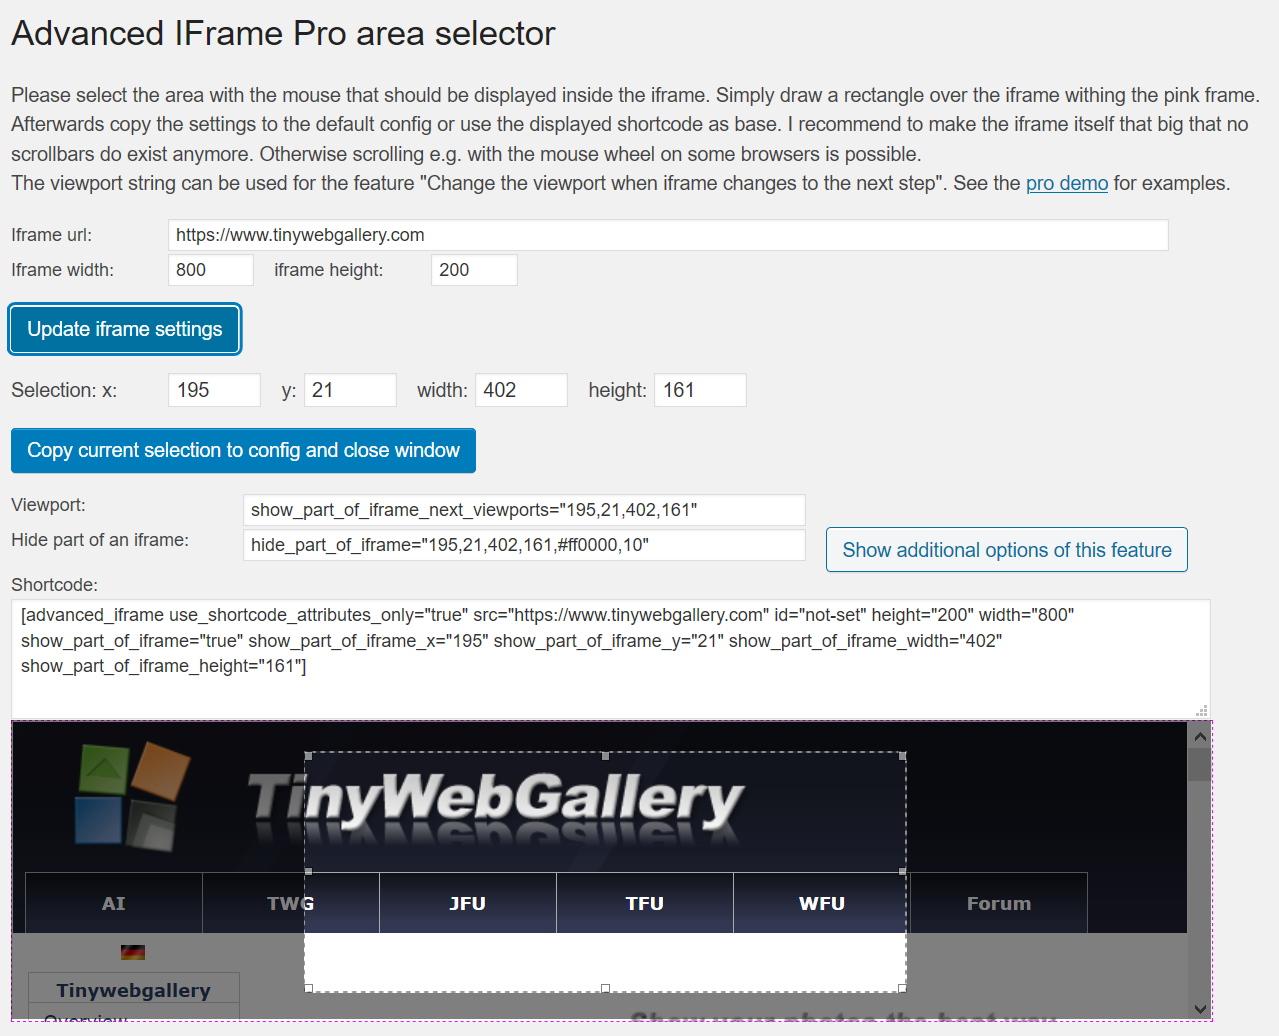
The area selector where you can pick a area simply by drag and drop.
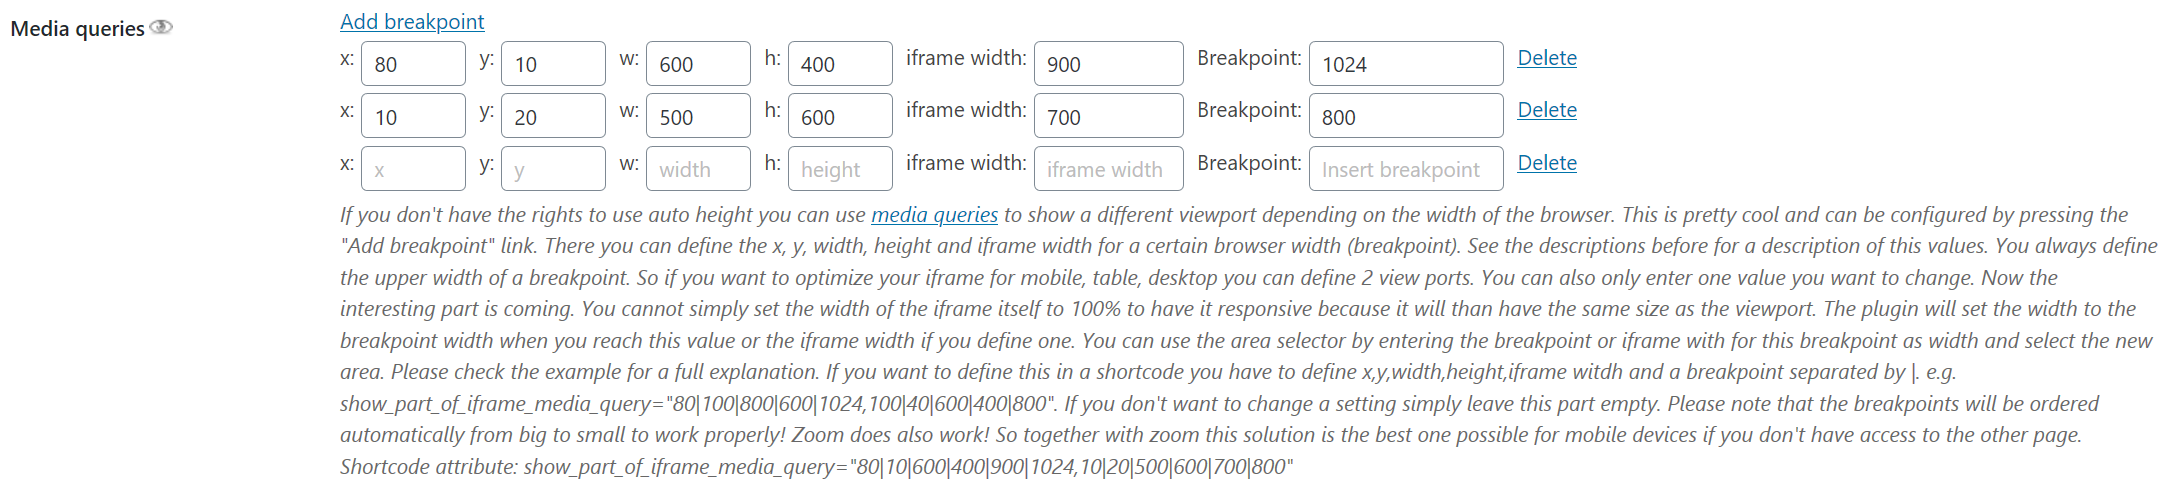
Here you can define additional media queries.
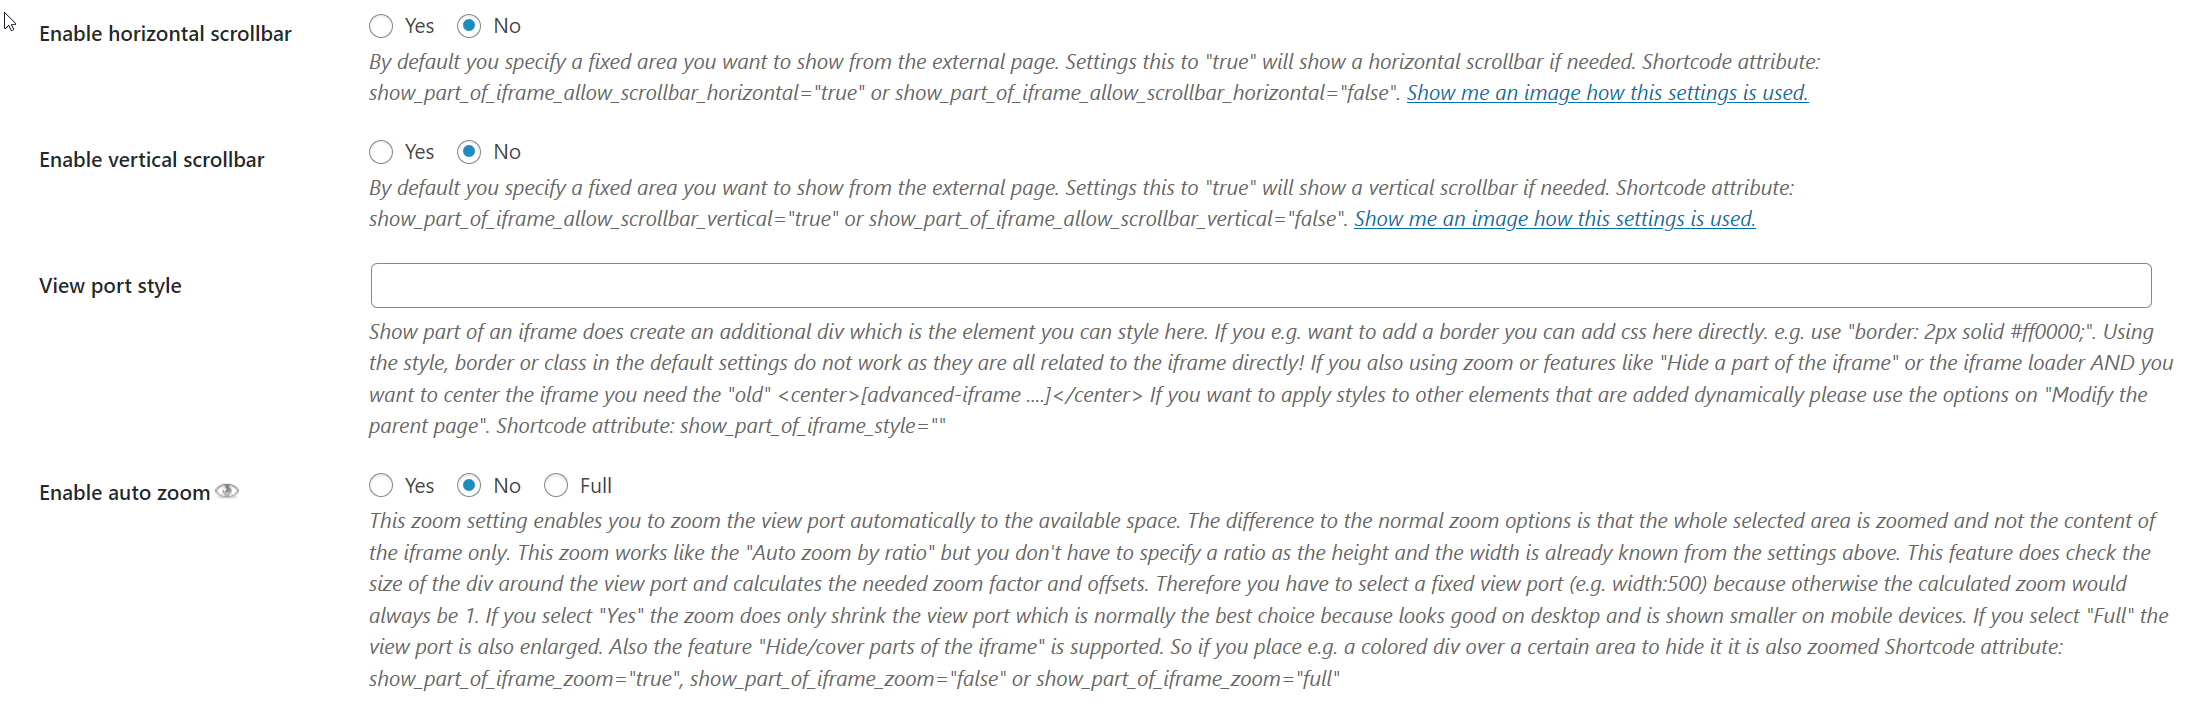
Additional features of "Show only a part of the iframe ".
Area selector
Advanced iframe has an area selector where you can easily select the area you like. You can play around with your own page here.
Example 1: Show a read only part of a remote page
See the example below where I only include the download statistics of advanced iframe on wordpress.org. See the full page here: https://wordpress.org/plugins/advanced-iframe/stats/. Please note: WordPress added the X-Frame-Options and this does not allow to include this page anymore. I have made a screenshot and included this on my example domain. This does not make a difference for the configuration but always be aware that the page you want to include can set this header!

This is the shortcode for this:
[advanced_iframe securitykey="your key" src="//www.mdempfle.de/examples/example1u2/screenshot.html" use_shortcode_attributes_only="true" id="example1" height="2000" width="1000" show_part_of_iframe="true" show_part_of_iframe_x="290" show_part_of_iframe_y="650" show_part_of_iframe_width="550" show_part_of_iframe_height="320" hide_elements=".info,#sidebar" content_id="#main" content_styles="margin-top:0px;width:910px" show_iframe_loader="true"]
Example 2: Show another read only part of the remote page of example 1
This is from the same page but a different area. Please note: WordPress added the X-Frame-Options and this does not allow to include this page anymore. I have made a screenshot and included this on my example domain. This does not make a difference for the configuration but always be aware that the page you want to include can set this header!
This is the shortcode for this:
[advanced_iframe securitykey="your key" src="//www.mdempfle.de/examples/example1u2/screenshot.html" use_shortcode_attributes_only="true" id="example2" height="2000" width="1000" show_part_of_iframe="true" show_part_of_iframe_x="190" show_part_of_iframe_y="1050" show_part_of_iframe_width="550" show_part_of_iframe_height="160" show_iframe_loader="true"]
Example 3: Use a different viewport after a user interaction
Often you include a page with links or a login form. After clicking on a link or submitting the form another page is shown. But the parent does not know what happens inside an iframe. It does not know to which url the user goes after a click ao a submit. The parent only knows that something has happend. So if you know what does happen and you need a different area of the new page you can define this in advanced iframe pro by setting a new viewport. And you can also tell ai pro also to loop between the defined viewports. This examples also use lazy loading with fadein.
As example I use 2 thumbnails which are on a different page. When you click on one of the thumbnails a bigger detail view is shown. If you click on the back link below the big image the view jumps back to the thumbnails.
Also for different viewports I have defined a new style (available since version 7.5) with parent_content_css. In this examples this creates a red border but in real live this can be used to enable/disable scrolling for certain viewports! ai-viewport-0 is the first viewport. Each viewport (ai-viewport-N) has his own class you can set what ever you want.
This is the shortcode for this:
[advanced_iframe securitykey="your key" src="//www.mdempfle.de/examples/example3u4/example.html" use_shortcode_attributes_only="true" id="example3" height="600" width="800" show_part_of_iframe="true" show_part_of_iframe_x="230" show_part_of_iframe_y="280" show_part_of_iframe_width="250" show_part_of_iframe_height="130" show_part_of_iframe_next_viewports="230,90,400,360" show_part_of_iframe_next_viewports_loop="true" enable_lazy_load="true" enable_lazy_load_threshold="200" enable_lazy_load_fadetime="5000" parent_content_css="#ai-div-example3.ai-viewport-0 { border: 5px solid red; }"]
Another example would be a login form where you get a confirmation page with a different size after entering you data. This example only shows the "good" way. Because most login forms also provide an error message you have 2 possible workflows: User enters valid data and comes to the confirmation page. Or the user does enter invalid data and stays on the login page. Because the parent does not know what has happens only workflow can be configured. So you always have to remember that there is not 100% solution possible. See the external iframe page here.
This is the shortcode for this:
[advanced_iframe securitykey="your key" use_shortcode_attributes_only="true" src="//www.mdempfle.de/examples/example3u4/example.html" id="example3a" height="600" width="800" show_part_of_iframe="true" show_part_of_iframe_x="21" show_part_of_iframe_y="213" show_part_of_iframe_width="166" show_part_of_iframe_height="136" show_part_of_iframe_next_viewports="573,243,205,128" enable_lazy_load="true" enable_lazy_load_threshold="200" enable_lazy_load_fadetime="5000"]
Example 4: Jumping to a different url after an user interaction
Using this feature enables you to jump to a predefined url after a page change in the iframe is detected. This can e.g. be used the following way: You want to include the login of a certain page to your site. When the user does login the user does not stay inside the iframe but is redirected to an url you specify. This way you can login the user to e.g another of your sites and redirect him there that he can whatever is possible when he is logged in ;).
The example below shows the login window of the TWG demo. If you use the credentials test/test you get automatically logged into TWG and get forwarded to the "Usa(2005)" folder. Look at the right upper corner. There you see that you are already logged in if you use the right login.
This is the shortcode for this:
[advanced_iframe securitykey="your key" use_shortcode_attributes_only="true" src="//www.tinywebgallery.com/demo/i_frames/i_login.php?twg_album=08_Usa%282005%29" id="example4" height="300" width="300" show_part_of_iframe="true" show_part_of_iframe_x="5" show_part_of_iframe_y="5" show_part_of_iframe_width="280" show_part_of_iframe_height="160" show_part_of_iframe_new_window="_top" show_part_of_iframe_new_url="//www.tinywebgallery.com/demo/twg_image/08_Usa%282005%29/CIMG2797.jpg"]
Example 5: Using scrollbars for a view port
You can also enable scrollbars for the view port. This makes it possible to e.g. show a very long website inside your website and remove the header or the side parts. The example below shows the feature page of TinyWebGallery without the header, the left and the right column. See the full page here: www.tinywebgallery.com/en/features.php. The shortcode was created with the area selector and then the scrollbar was enabled. Select a little bit more because of the scrollbar.
This example does also use the new auto id feature of advanced iframe. If no id is set <default id>_<post id>_<counter> is used as id and name and therefore avoids configuration problems when several iframes are used. This feature does work on ANY domain.
This is the shortcode for this:
[advanced_iframe securitykey="your key" use_shortcode_attributes_only="true" src="//www.tinywebgallery.com/en/features.php" id="example5" height="2400" width="960" show_part_of_iframe="true" show_part_of_iframe_x="165" show_part_of_iframe_y="170" show_part_of_iframe_width="650" show_part_of_iframe_height="375" show_part_of_iframe_allow_scrollbar_vertical="true" enable_ios_mobile_scolling="true"]
Example 55: Show different view ports with media queries
New in 2020.4!
Please note that this is an advanced topic where you should have css knowhow. If you have no idea what media queries are please read some tutorials about this topic first. e.g. www.w3schools.com/css/css_rwd_mediaqueries.asp.
This example shows how to include only a part of an iframe with a page that is responsive and has a defined break points where the display changes. By default you define a fixed size for the view port you want to show and I recommend to set the size of the iframe itself also to a fixed size to be sure that always the same area is in the view port.
But if the page in the iframe is also responsive it could make sense to use media queries for the feature also.
The example below shows the header of this page. My page has a breakpoint at 1024px. If the browser has a higher width than the menu is shown above the header. Below this the burger menu is shown. There are 2 more breakpoints defined where the header is centered and when made very small the view port in enlarged because of line breaks.
Please resize your browser and you see that at 1024 px the iframe width and view port changes! This enables you that you have different widths of the iframe and also related to that different viewports you can show.
Important:
- The break point is NOT the break point inside the iframe but the size of the parent!
- If you need more modifications like different margins please create your own style sheet and include it with the plugin.
- Check the next demo also. Here additional the zoom is used. This makes the transitions even more smooth!
And the shortcode which is used is:
[advanced_iframe use_shortcode_attributes_only="true" src="//www.tinywebgallery.com/blog/advanced-iframe/advanced-iframe-quick-start-guide" id="example55" height="6000" width="1200" show_part_of_iframe="true" show_part_of_iframe_x="110" show_part_of_iframe_y="90" show_part_of_iframe_width="980" show_part_of_iframe_height="146" show_part_of_iframe_media_query="110|5|740|146|980|1023, 0|0|500|146|500|800, 0|5|460|200|400|560"]
Adding zoom to the example before
Here also show_part_of_iframe_zoom="true" was added. This means if a viewport is larger than the screen it is zoomed smaller already. Normally this would make the area you have selected very small. Together with the media queries you can now define also breakpoints where you can show this "bigger" again. Below in the demo I have the breakpoints configured in a "Demo" way to show this. So you start with a normal view which is getting smaller. At the defined breakpoints the area changes and the text gets "readable again". Below you see both ways to see the difference
Normal zoom:
Zoom with media queries:
And the shortcode which is used is:
[advanced_iframe use_shortcode_attributes_only="true" src="//www.tinywebgallery.com/blog/advanced-iframe/advanced-iframe-quick-start-guide" id="example55b" height="6000" width="1200" show_part_of_iframe="true" show_part_of_iframe_x="110" show_part_of_iframe_y="90" show_part_of_iframe_width="980" show_part_of_iframe_height="145" show_part_of_iframe_zoom="true" show_part_of_iframe_media_query="110|5|740|146|980|800, 0|0|500|146|500|600, 0|5|460|154|460|560"]
Have fun using Advanced iFrame Pro,
Michael