|
|
|
|
|
|
Joomla flash uploader help section
|
 Demos
Demos Screenshoots
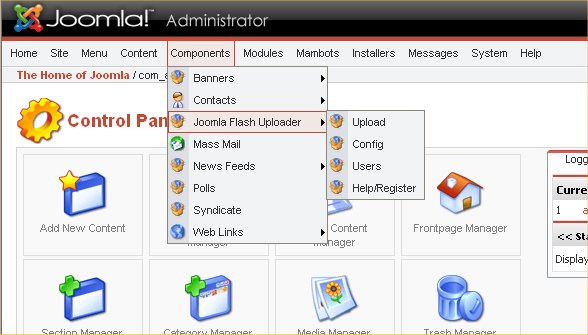


 Video tutorials
  Installation |
Profiles |
Groups |
Plugin and Javascript callbacks. |
Please note that you have to use the security token since 2.11.1 for the plugin!
Thanks to Zsolt
 Help / Howto / FAQ / Forum
 Forum
Forum
The forum of the TinyWebGallery has a special section for the JFUploader. Please post there if your problem is not covered in the help.
Video tutorials.
The video tutorials cover common scenarios which are explained also below in the FAQ.
The tutorials can be found on the JFU website -> watch them.
How to check if the Flash does work.
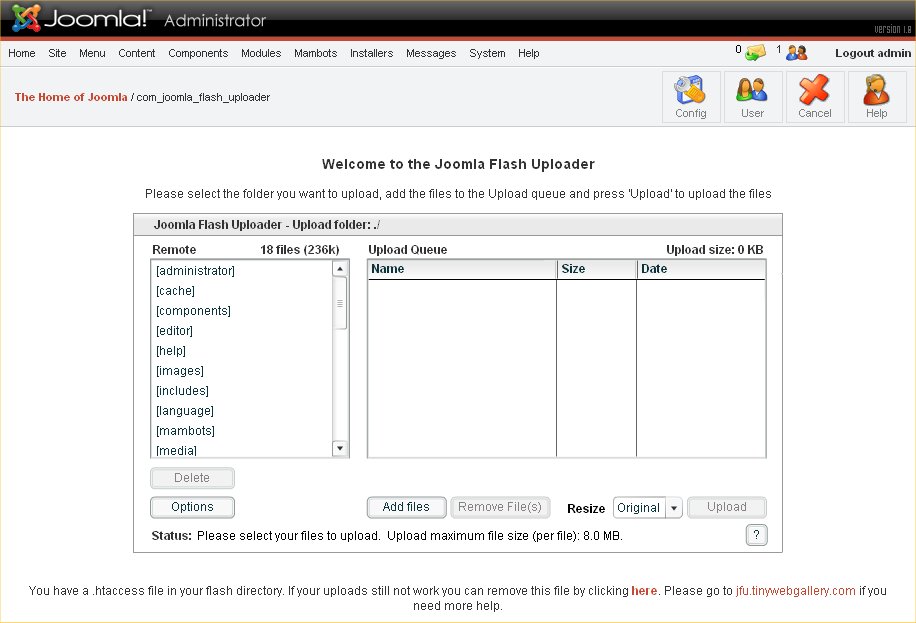
To verify that the uploader works correctly please perform the following steps:
- Go to 'Components -> JFUploader -> Upload'
- Check if the main directory of Joomla is listed on the left side. If not please log off Joomla and close your browsers and login again to get a new session.
- If you get the message 'The folder has no write permissions. All actions are disabled.' you have to change the permissions of the folder you want to upload that php can write to this folder. Most of the time you need 777 (sometimes 775 is enough).
- Upload an image. If this does not work and the flash say you have to copy a .htaccess file please go to 'Components -> JFUploader -> Upload'. At the bottom of the page you can create this file, then retry.
- If you have a .htaccess to protect your Joomla administration you have to move the tfu folder to the site components directory. On the JFU config page you can do this (since 2.10.3) and find all info you need to know!
If the flash does not work: Please go to the website by using this link (-> TFU FAQ 1) or go to www.tinywebgallery.com -> TWG Flash Uploader -> Installation & FAQ -> FAQ 1. There the most server problems/restrictions are explainded.
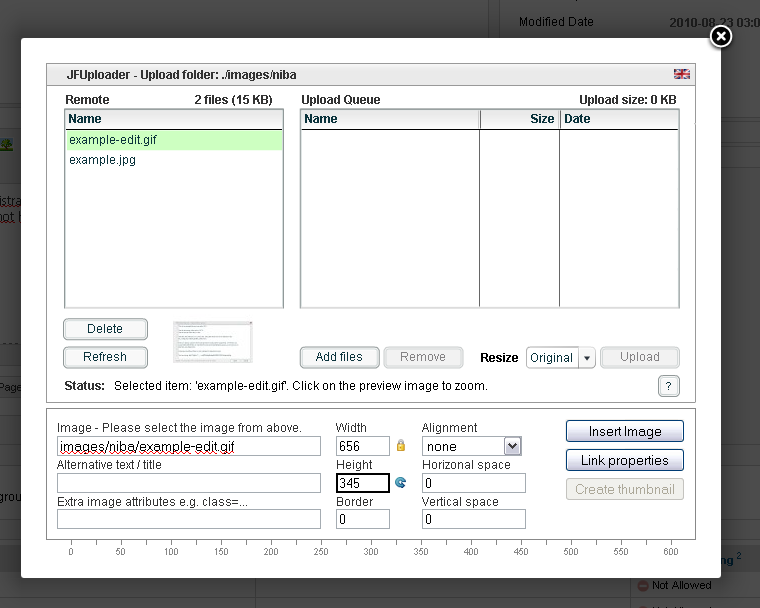
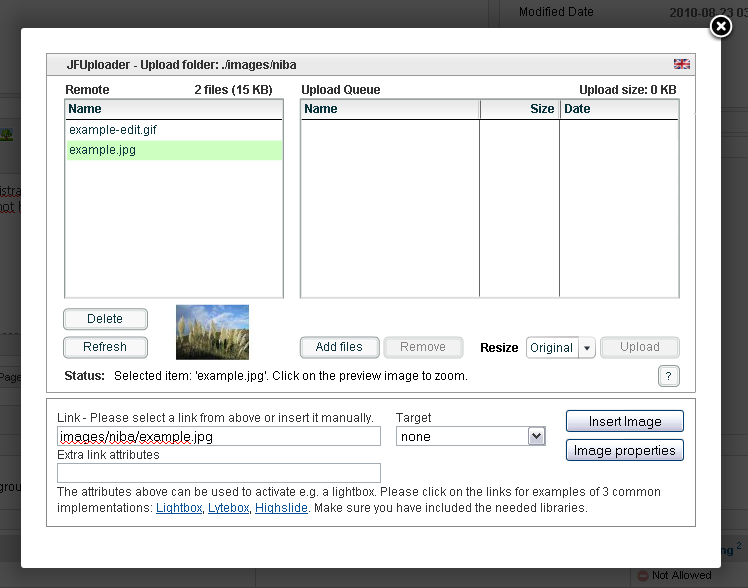
How to use the JFUploader in the backend
Simply upload files by using the Upload menu item! By default the main directory of Joomla is selected. The 1st profile (1) is the profile used for the uploader of the backend. This profile should only be used for the administrator.
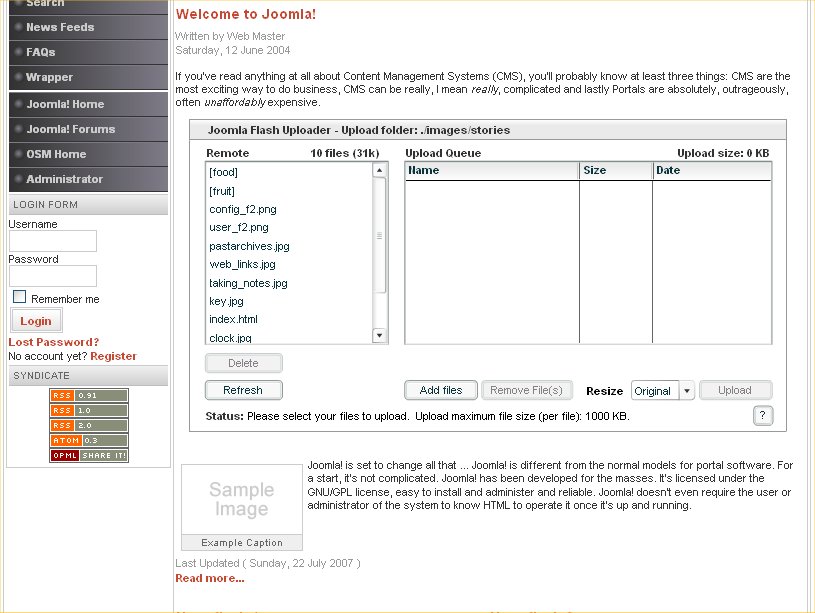
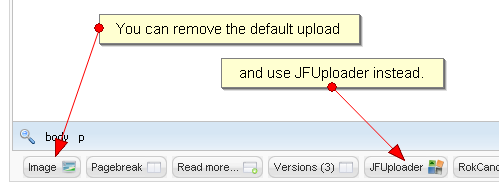
How to use the JFUploader in the front end
The most interesting feature is to offer the upload flash to your front end users. This can be done in two ways: Using the component and using the mambot.
- Component - You can include the flash to your front-end by selecting Menu -> <your menu> -> New -> Component. Select JFUploader and press apply. Then you have to enter the mandatory parameters (Profile Id/Group Id and ID) for the component. Please read below what you have to enter ;). In the profile you can specify a title and the text before and after the flash. If you want to include the flash in one of your existing pages please use the mambot/plugin
- Mambot/Plugin - Use the mambot/plugin if you want to integrate the flash into one of your pages. Please read "How to use the mambot" about usage and below about the parameters you have to use.
Now you know how you can include it - but the interesting part is how you can configure it ;). There are two ways:
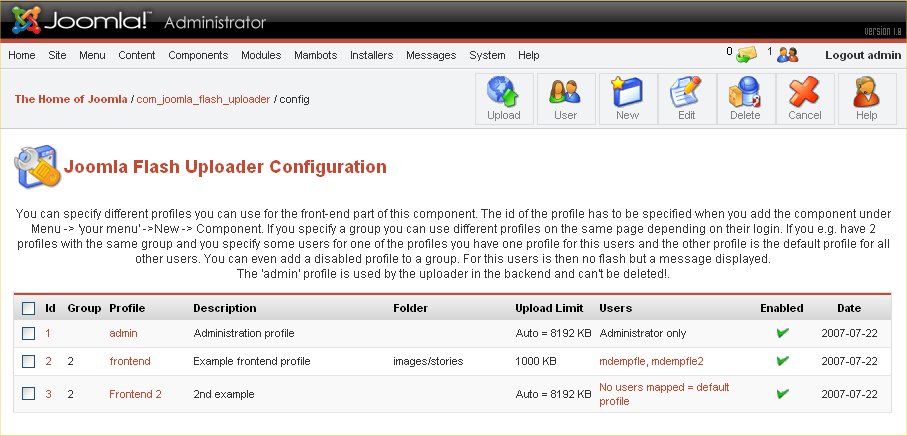
- Profile - You can create a profile by selecting Components -> JFUploader -> Config. Here you find the different profiles. By default two profiles do exist. Profile 1 is the administrator profile and used in the back end - and should only be used for this purpose! Profile 2 is an example profile you can use for your users in the front-end. Using a profile means that all users that have access to the page where the flash is visible get the settings of this one profile. The users you assign to a profile only used if you use groups!
If you want to use a profile this you have to select Profile ID in the component in the menu or 0 as type for the mambot/plugin and use the id of the profile you want to use.
Please read 'How to use a master profile' if you like one folder created automatically for each user! - Group - The more advanced way is to use a group id. A group is a set of profiles where the profile is selected depending on the user that is logged in. This makes it possible to use different profiles on the same page.
- Set up at least 2 profiles (the admin profile should not be used!).
- Edit this profiles and assign the same group id to all of them!
- You always need a default profile. This is the profile where no users are assigned to. This is used for not assigned users and if the flash can be accessed without login. You can disable the default profile if you like. Then the text of the "Text before the flash" is shown.
- Assign user to the other profiles. This can be done by draging at the profile on the User tab or at Components -> JFUploader -> Users. Simply select the user and the profile and click add. At the bottom you see your current mappings where you can delete them too.
If a user is logged in and a profile is mapped to this user this profile of this group is used. - Select Group ID in the component in the menu or 1 as type for the mambot/plugin and enter the group id you want to use.
- Look for a user and if a mapping is found this profile is used.
- Look for a Joomla group and if one of the users groups matches this profile is used. If a user has serveral groups and several matches the one with the lowest group id is used.
- Look for the default profile and if you have defined a default profile this is used.
- If no profile is found an error message is displayed.
How to use a master profile
Before JFU 2.8 you needed to create a folder for every user you want to allow to upload files. If a lot of users should use the same folder this was fine. But if you like that every user has his own upload folder you had to create a profile for every user, assign this user to the profile and put all profiles to one group.
Since 2.8 you can set in the config of a profile that it is a master profile! Then for every registered user a sub directory of the profile directory is created and the user can only access this folder. The foldername is either the login or the user id.
New 2.8.3.2: You can copy a default folder structure with files and folders to a new created user directory. You have to create a folder called 'default' in the directory components/com_jfuploader. Everything inside the default folder is copied to a user directory when it is created. This can be a simple index.htm but also a full folder structure.
How to make the flash fit into your site
You can define the size of the flash in the profile. Simply enter the width you need and the flash is resized to this size. You have to check if the flash is still displayed nicely in your size. Optimal width is 650 pixel.
How to use the mambot/plugin
If you want to integrate the flash into one of your existing pages you can use the mambot/plugin of JFUploader. Make sure to install this mambot/plugin AND publish it. Use the following format:
{joomla_flash_uploader type=<0 or 1> id=<profile or group id>}
Since JFU 2.11.1
{jfuploader type=<0 or 1> id=<profile or group id> securitytoken=<security token>}
- type is the selector if a profile is selected directly or a group is used. 0 = profile, 1 = group.
- id is the number of the profile or the group.
- securitytoken is a unique key which prevents that type or id can be changed by e.g. a publisher or editor. This token is different for every Joomla installation!
Since JFU 2.11.1 you find a generator for the plugin code on the config page of JFU. This will generate the plugin code with the security token for all possible profiles and groups you have configured. This new feature makes it impossible that frontend editors of your site to get more access than you have configured! Therefore please update to this version if you use the plugin in the frontend!
For example: {joomla_flash_uploader type=0 id=2 } Since JFU 2.11: {jfuploader type=0 id=2 securitytoken=19a6bd2ad78eee19675905306a73aebc}
New 2.8.1:
For Joomla 1.5.x the plugin code is still visible if you disable the plugin or set the access level to e.g. registered. In 1.5.x there are only some workarounds to solve this. For JFU I have implemented the following solution. Include the plugin with
<!-- {joomla_flash_uploader type=<0 or 1> id=<profile or group id>} -->
Since JFU 2.11
<!-- {jfuploader type=<0 or 1> id=<profile or group id> securitytoken=<security token>} -->
If the plugin is enabled I do automatically remove the html comment <!-- --> and the plugin is shown properly. If the plugin is disabled the code is still there but not shown because of the html comment.
How to make the text before and after the flash language dependant
In the configuration you have to option to use the textboxes below or to use the language file. If you use the language file you can display the text depending on the language your user is using. Please select 'Use language file' and enter the text in the language files.
For Joomla 1.0.x the language file is located at administrator\components\com_jfuploader\language and the following entries can be made:
- $GLOBALS["JFU_TEXT_TITLE_<profile id>"] = "Title";
- $GLOBALS["JFU_TEXT_TOP_<profile id>"] = "Text before ";
- $GLOBALS["JFU_TEXT_BOTTOM_<profile id>"] = "Text after";
For Joomla 1.5.x the English language file is located at language\en-GB\en-GB.com_jfuploader.ini and the following entries can be made:
- JFU_TEXT_TITLE_<profile id>=Title
- JFU_TEXT_TOP_<profile id>=Text before
- JFU_TEXT_BOTTOM_<profile id>=Text after
The language files for the other language do NOT exist yet. You have to create them and place them where language files below in the Joomla version you use. For Joomla 1.0.x it's the same location as the English file. For Joomla 1.5.x there you first have to go to the language folder of you language and then create the file in the same format as the other language files. e.g. for German: language\de-DE\de-DE.com_jfuploader.ini
How to use the Javascript callbacks - registered version only
If you are registered you can use the Javascript callbacks of the flash. You have to add the Javascript to the site and activate the Javascript call.
Right now 8 Javascript calls are available:
- uploadFinished
- previewSelect
- deleteFile
- changeFolder
- createFolder
- renameFolder
- deleteFolder
- copymove
The Javascript below is an example for a call after the upload:
<script type="text/javascript">
function uploadFinished(loc) {
// you can do something after the upload - loc is the parameter you provide in the config!
// you can call e.g. a php page where you have stored infos during upload!
// e.g. if you want to jump to another page after upload the code could be:
// window.location.href=loc;
alert(loc);
}
</script>
You can use 2 ways to include the Javascript:
- You have to use the mambot/plugin (see 'How to use the mambot/plugin') and include the Javascript directly to your site. Make sure your editor allows to enter Javascript!
- You can use the component.
Go to the configuration to the profile, enter the Javascript in the 'Text after the flash' box and make sure 'Use textbox below' is selected. You can use the example above as a first start. Make sure to include the <script> .. </script> tags as well.
Now you have to enable the Javascript call. For our upload example this would be the setting 'Enable Javascript upload call'. Enter something in the textfield. The value you enter here is the parameter you get as loc in the uploadFinished(loc) function. In your example avove this parameter is only shown in an alert box. On the website you find a working example at the registered demo of TFU where Javascript calls trigger the display of data. The Javascript reads the data from a status.php which is displayed below the flash then. You can download the example at the page to see how this is is done.
Done.
Example:
Enter
<script type="text/javascript">
function uploadFinished(loc) {
window.location.href=loc;
}
</script>
In the 'Text after the flash' box and make sure 'Use textbox below' is selected.
Then go to the "Registered settings tab -> Enable Javascript upload call" and enter e.g.
http://www.tinywebgallery.com
to get redirected to tinywebgallery after the upload. You should of course use your url ;).
How to add your own language
There are 2 parts to translate: The Joomla integration part and the Flash itself.
The flash is available in 24 languages right now. For the full list please go to the website
and check the languages of the TWG Flash Uploader.
If you want to translate the backend you simply have to tranlate the language/english.php language file.
But this not the important part because this only used in the administration.
If your language of the flash is not included you can translate the flash by translating the en.xml in the tfu/lang folder.
To enable the automatic mapping of the language open the joomla_flash_uploader.class.php and search for the section where the language
mappings are and add your language there. Please send the translated xml back to me that I can include it to the next release.
How to change the colors of the flash - professional licence or above
If you have a personal license or above you can change the colors of the flash. It's not possible to change everything (e.g. the colors of the buttons are defined in a theme and there you can only set 3 different ones. If you like to modify these to you need to modify the source code by yourself) but most colors can be changed. If you have a source code license you can either change the colors by yourself but of course use this settings too. You only have to remove the body of the method MLayout.as -> resetColors. If your license does already contain TWG_SOURCE in the domain this is not needed.
Colors does always have to be in the hexadecimal format. e.g. AA00FF unless something else is described. This are the possible colors you can change:
- c_theme - The basic theme of the flash - possible settings are "haloOrange", "haloGreen", "haloBlue". You can also set the color you like in the format "0xff00ff".
- c_text - The basic color of all texts
- c_text_header - The color of the header text (for popups too!)
- c_header_bg - The background of the header
- c_header_bg_2 - The 2.nd background of the header - makes a gradient fill from c_header_bg to c_header_bg_2.
- c_bg - The main background
- c_border - The color of the border
- c_list_bg - The background of the list and the grid
- c_list_header - The background color of the header of the grid
- c_list_header_solid - set this to "true" if you like to have a solid list header. All gradients are fading to white because this is hardcoded in the core (new 2.8.3).
- c_progress_text - The color of the text on the progress bar
- c_progress_label - The color of the label left to the progress bar
- c_progress_bar - The color of the moving part of the progress bar
- c_progress_bar_bg - The color of the background of the progress bar
- c_progress_bar_seperator - The color of the small seperators in the progress bar
- c_popup_bg - The background color of popups like the login
- c_popup_header_bg - The background of the headers of the popups
- c_popup_header_bg_2 - The 2.nd background of the headers of the popups - makes a gradient fill from c_popup_header_bg to c_popup_header_bg_2
- c_popup_border - The color of the border of the popups
- c_bg_numbers - The background of the line numbers - This color is related to the backgound color but with an alpha channel - you have to find the right color e.g. with a tool that shows you the color of the background when faded.
- c_numbers - The color of the numbers
- c_status - The color of the status line. If not set c_text is used
New JFUploader 3.0 - c_add_bt_color - The text color of the add files button
- c_add_bt_bg_color - The background color of the add files button
- c_add_bt_weight - The font weight of the add files button - possible settings are "none", "bold"
- c_add_bt_theme - The theme of the add files button - possible settings are "haloOrange", "haloGreen", "haloBlue". You can also set the color you like in the format "0xff00ff".
- c_upload_bt_color - The text color of the upload button
- c_upload_bt_bg_color - The background color of the upload button
- c_upload_bt_weight - The font weight of the upload button - possible settings are "none", "bold"
- c_upload_bt_theme - The theme of the upload button - possible settings are "haloOrange", "haloGreen", "haloBlue". You can also set the color you like in the format "0xff00ff".
New JFUploader 3.2 - transparent background - c_bg = "FFFFFF"
+
c_bg_transparent = "true"
+
Set "Fix overlay" in the profile to 'Yes'.
To set a color you simly add them in JFU in the free text field of the profile like url parameters. e.g. &c_text=FF00FF&c_border=00FF00.
If you don't have a professional license or above and set colors this way then all colors are set to white.
New TFU 3.1:
You can now style the messages in the status bar with simple html! If you like e.g. to make the upload_completed message in a different color and e.g. as link you nedd to use the following
<LANG><KEY>upload_completed</KEY><VALUE><![CDATA[<font color="#ff00ff"><a href='http://www.tinywebgallery.com'>Upload completed...</a></font>]]></VALUE></LANG>
Flash does not support any styles here. You can use simple html tags like <font>,<a>,<b>. All the settings have to be in ![CDATA[ ... ]]. Otherwise the xml file would be invalid if you use html tags there.
New TFU 3.2:
To set the transparent background you need to set c_bg = "FFFFFF" and c_bg_transparent = "true". Furthermore you need to set wmode = "transparent" directly at the flash as a parameter. You can set wmode = "transparent" by setting "Fix overlay" in the profile to 'Yes'.


